joins... joins... everywhere

I have a curse. My curse is curiosity.
Here in Percona I found one person that is very “dangerous” for me, and he and I also share the same first name, well almost, Marcos Albe.
Marcos is a smart guy with a lot of ideas, and he is not shy to share them. One day we were talking about sysbench, and he mentioned to me: you know it would be nice to have a test for joins in sysbench. I wonder why we don’t have it; it will be so useful to identify regressions in that area.
You see where this is going right? He put that in my mind, luckily I was busy with other stuff and I forgot. Until one day. That day I had to take a more in-depth look at some claims about joins performance regressions. In that moment Marcos voice comes back as an echo resonating in my mind … it would be useful to identify regressions…
That’s it. Ok let’s do it, let’s build this joins test and see how it goes, and shut Marcos up.
I used sysbench as an engine but then I diverged a lot while implementing the test in lua. My idea was to build a simple test but got trapped in the mechanism and (never ask AI) at the end I came up with 41 different tests and a quite complicated table(s) definition.
Let’s see both together.
Table(s) structure
In the new test we have two different sets of tables, the main table and the level table. The main table name can be renamed as you like using the usual sysbench parameter table_name, the level table name is fix levelX and for now you have queries with only one level or all of them. Already planning to make this customizable but for now it is like that.
The main table structure is as follows:
CREATE TABLE `%s%d` (
      `id` %s,
      l1_id INT,           -- Foreign key to level1.id
      l2_id INT,           -- Foreign key to level2.id
      l3_id INT,           -- Foreign key to level3.id
      l4_id INT,           -- Foreign key to level4.id
      l5_id INT,           -- Foreign key to level5.id
      -- Numeric data types
      small_number SMALLINT,
      integer_number INT,
      myvalue BIGINT,
      decimal_number DECIMAL(10, 2),
      float_number FLOAT,
      -- String data types
      char_field CHAR(10),
      varchar_field VARCHAR(255),
      color VARCHAR(50),
      continent VARCHAR(255),
      uuid VARCHAR(36) CHARACTER SET latin1,
      uuid_bin BINARY(16),
      text_field TEXT,
      -- Date and time data types
      datetime_field DATETIME,
      timestamp_field TIMESTAMP DEFAULT CURRENT_TIMESTAMP,
      year_field YEAR,
      -- Binary data types
      binary_field BINARY(50),
      varbinary_field VARBINARY(255),
      -- Special data types
      enum_field ENUM('active', 'inactive', 'pending'),
      set_field SET('read', 'write', 'execute', 'delete'),
      -- Boolean type
      is_active BOOLEAN DEFAULT TRUE,
      -- Spatial data type (if using GIS)
      -- point_field POINT,
      -- Constraints
      UNIQUE KEY unique_varchar (uuid),
      INDEX idx_l1_id (l1_id),
      INDEX idx_l2_id (l2_id),
      INDEX idx_l3_id (l3_id),
      INDEX idx_l4_id (l4_id),
      INDEX idx_l5_id (l5_id),
      INDEX idx_date (datetime_field),
      INDEX idx_time (timestamp_field),
      INDEX idx_enum_field (enum_field),
      INDEX idx_set_field (set_field),
      INDEX idx_year_field (year_field),
      INDEX comp_attributes(continent,enum_field,set_field),
      INDEX comp_color(color,continent,enum_field,year_field)
)
As you can see the main table has many more attributes and datatypes than the simple test existing in the basic sysbench and more than my other windmills test.
It also has several attributes with variable length, this is to be able to emulate cases where unordered pages are present, which is the common case in production. (see also https://www.tusacentral.net/joomla/index.php/mysql-blogs/186-innodb-page-merging-and-page-splitting). To achieve that you just need to generate write traffic on the main tables, this is not available yet in the test but is not difficult to implement. As such at the moment we should consider the test executed always on Ordered pages.
Level table structure:
CREATE TABLE `%s%d` (
      `id` %s,
      continent VARCHAR(45) NOT NULL,
      parent_id BIGINT,  -- For hierarchical structure if needed
      time_accessed TIMESTAMP DEFAULT CURRENT_TIMESTAMP ON UPDATE CURRENT_TIMESTAMP,
      l1_id INT,
      l2_id INT,
      l3_id INT,
      l4_id INT,
      l5_id INT,
      record_name CHAR(36),
      record_code CHAR(5),
      record_value BIGINT,
      record_status ENUM('active', 'inactive', 'pending'),
      record_priority INT NOT NULL,
      INDEX idx_country (continent),
      INDEX idx_parent_id (parent_id),
      INDEX idx_l1_id (l1_id),
      INDEX idx_l2_id (l2_id),
      INDEX idx_l3_id (l3_id),
      INDEX idx_l4_id (l4_id),
      INDEX idx_l5_id (l5_id),
      INDEX idx_time_accessed (time_accessed),
      INDEX idx_record_status (record_status),
      INDEX idx_record_priority (record_priority),
      INDEX comp_record_continent_status_priority(continent,record_status,record_priority)
In this case the table structure is much simpler (than main) and it has only one attribute (Country) which is Variable, this to reduce the possibility to have unordered pages to the minimum.
The Tests
Now combining the tables I have built the following scenarios:
· insert_update_delete_queries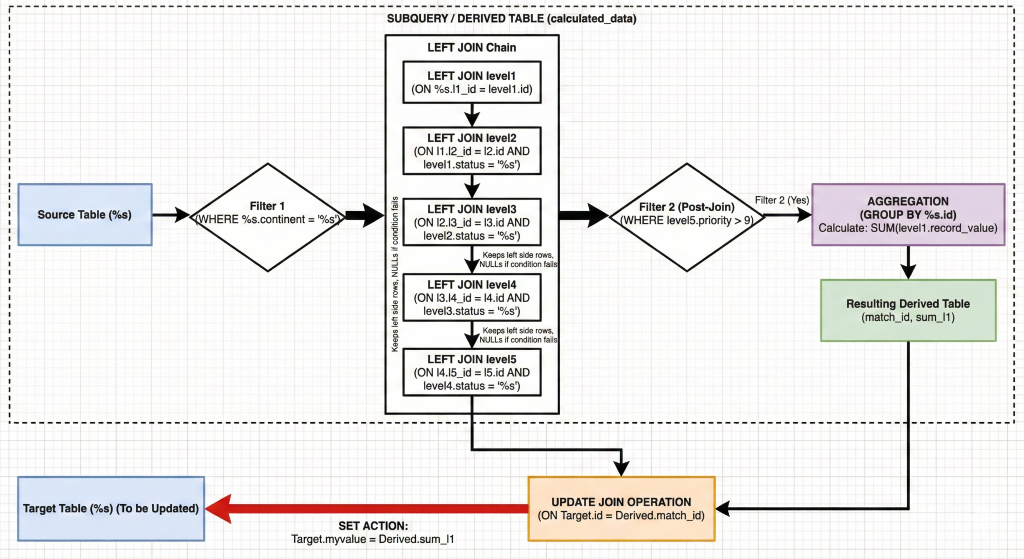
· inner_queries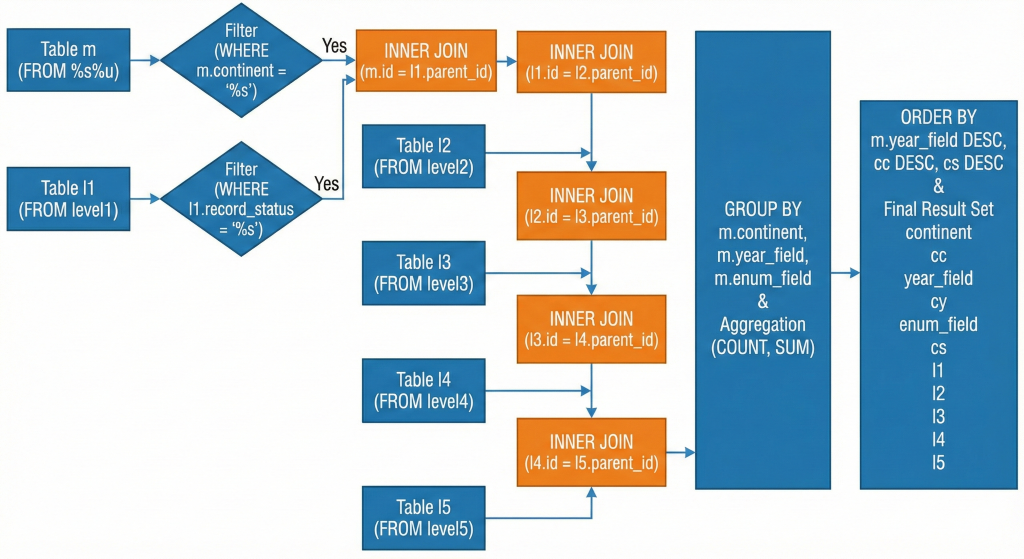
· left_queries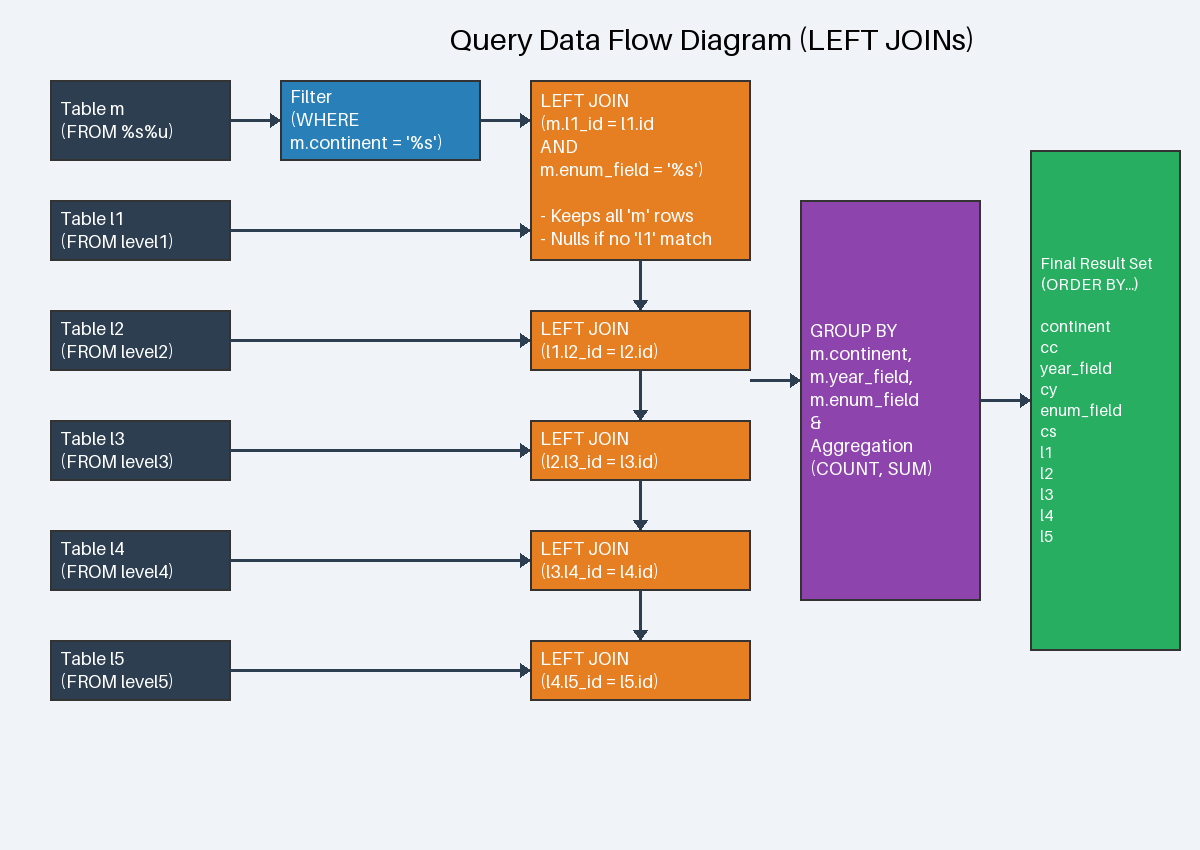
· right_queries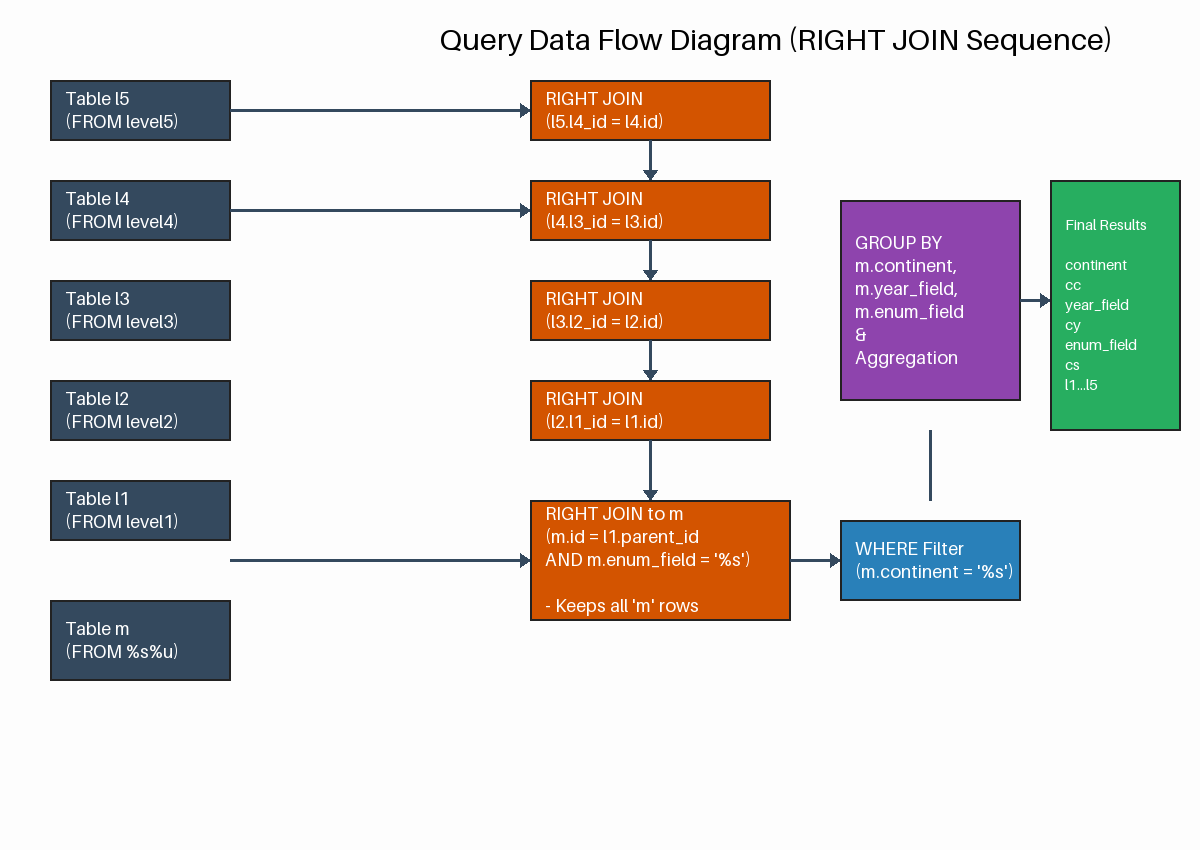
Pro-Tip from Celko: Avoid RIGHT JOIN whenever possible. It is mathematically equivalent to a LEFT JOIN with the tables swapped. Using only LEFT JOIN makes your queries more readable and follows the "natural" left-to-right reading order of SQL.
· semi_join & anti join condition_queries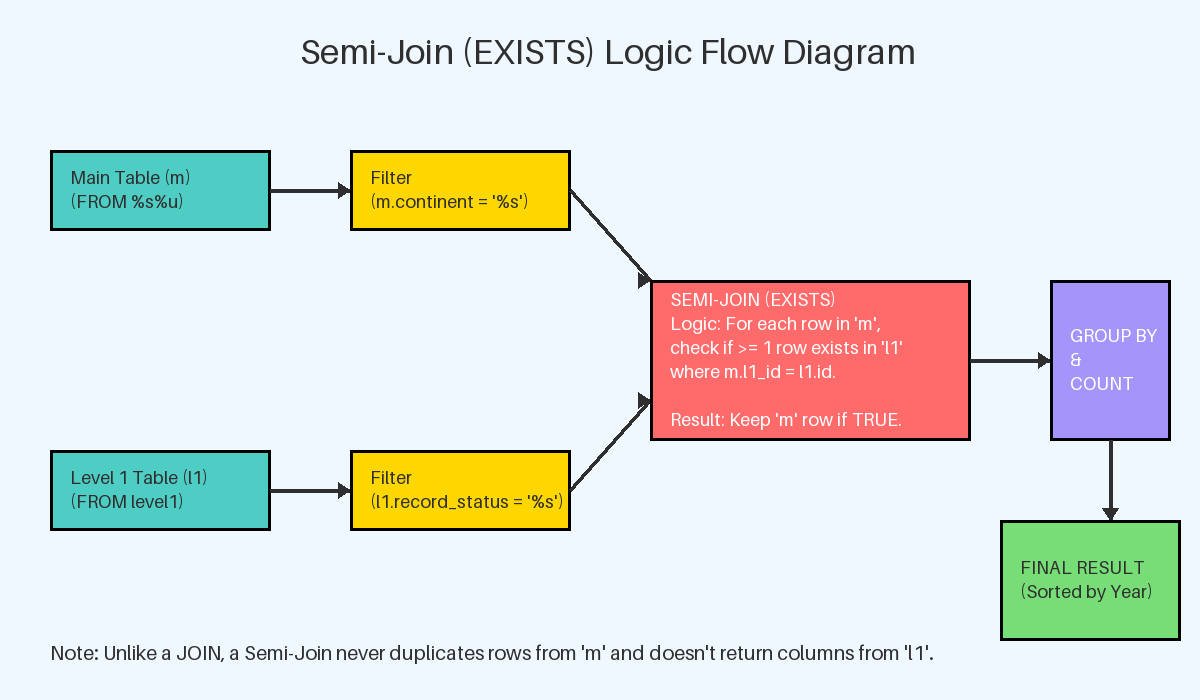
· subquery_queries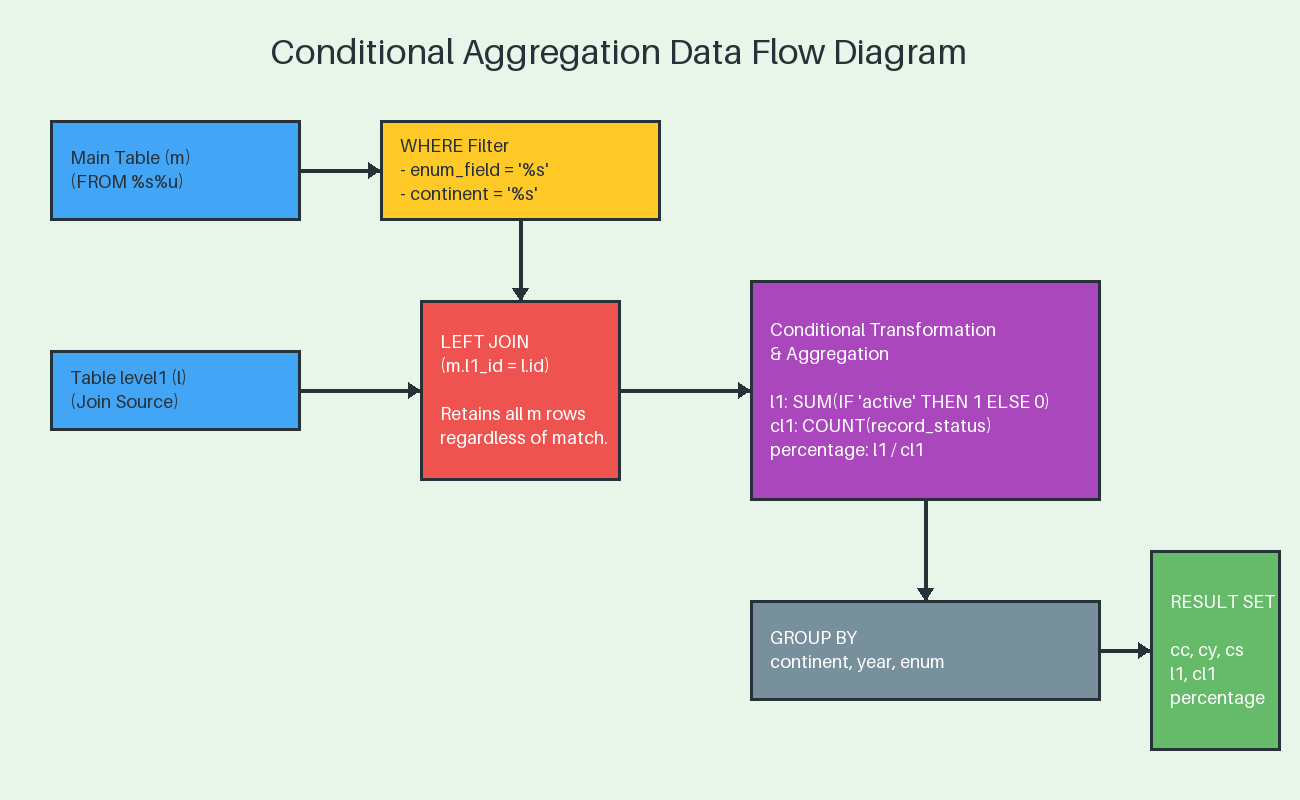
Using the above I have built the following scenarios:
- anti_join_left_join_pk
- anti_join_not_exists_pk
- conditional_join_pk
- inner_subquery_multi_pk
- left_subquery_multi_pk
- multi_left_forcing_order
- multi_left_index
- multi_left_pk
- multi_left_straight
- multilevel_inner_forcing_order_index
- multilevel_inner_index
- multilevel_inner_pk
- multilevel_inner_straight_index
- multi_right_forcing_order
- multi_right_index
- multi_right_pk
- multi_right_straight
- right_subquery_multi_pk
- semi_join_exists_pk
- simple_inner_forcing_order
- simple_inner_index
- simple_inner_index_GB
- simple_inner_pk
- simple_inner_pk_GB
- simple_inner_straight
- simple_left_exclude
- simple_left_forcing_order
- simple_left_index
- simple_left_index_GB
- simple_left_pk
- simple_left_pk_GB
- simple_left_straight
- simple_right_forcing_order
- simple_right_index
- simple_right_index_GB
- simple_right_pk
- simple_right_pk_GB
- simple_right_straight
- update_multi_inner_join_pk
- update_multi_left_join_pk
- update_multi_right_join_pk
Where simple means only one level of joins while multi is all the five levels.
If you want to review them you can easily do it reviewing the file in github (https://github.com/Tusamarco/sysbench/blob/master/src/lua/joins/join_queries.lua)
Please keep in mind a couple of things:
-
This is just a start; I do not pretend to cover all and I am open to add whatever it will be identified as useful.
-
You are encouraged to test and modify any part of the code, query, table structure and share your changes, the more we work on this together the better it will be.
How to use it
First clone the repo as usual, build sysbench and install it, instructions here(https://github.com/Tusamarco/sysbench/tree/master?tab=readme-ov-file#build-and-install).
Unless you do it manually the tests in the src/lua/… will not be copy over if you want you can modify the file https://github.com/Tusamarco/sysbench/blob/master/src/lua/Makefile.am to have them installed with make install.
As usual the first step is to create and populate the schema:
sysbench /opt/sysbench/src/lua/joins/oltp_read_write.lua --mysql-host=<ip> --mysql-port=<port> --mysql-user=<user> --mysql-password=<pw> --mysql-db=joins --db-driver=mysql --report-interval=1 --table_name=main --tables=15 --table_size=100000 --threads=15 prepare
This will create 15 main tables and 5 levelX tables, both with 100000 rows.
I suggest you create a schema with a decent number of rows, in general the dimension of all rows in a table should exceed the allocated memory buffer. So, if you have a 10GB Innodb buffer pool, it would be nice to have each table to be at least 15GB.
Always do a warmup, that will fill the BP with data, most likely from the last main table, but this is fine, you just want the BP to be hot.
Once done you can run the tests.
To evaluate the join execution, I think that the most immediate metric is the execution time. Given that when you run the test you should set –time=0 –events=X where X is the number of events you want to execute.
How many queries will an event have? Easy, if you define it as a parameter, by default all the joins are set to 0, which means disable and you need to enable it.
For instance if you want to execute simple_inner_pk test, you need to set --simple_inner_pk=1 where 1 is the number of occurrence, so if you set it to 1 you have one event one query, if you set --simple_inner_pk=2 you have that each event generate 2 queries… and so on.
Given the time taken is captured for the whole test, my advice is to keep the occurrence to 1 and eventually check/test how the platform scales by concurrent threads.
To do so, you need to set the number of events and threads to the same value.
See a full example below:
sysbench /opt/sysbench/src/lua/joins/oltp_read_write.lua --mysql-host=<ip> --mysql-port=<port> --mysql-user=<user> --mysql-password=<pw> --mysql-db=joins --db-driver=mysql --skip_trx=off --report-interval=1 --histogram --table_name=main --stats_format=csv --tables=15 --table_size=1000000 --time=0 --multilevel_inner_pk=1 --events=5 –threads=5 run
This will record the time taken to execute 5 queries in parallel.
While you can enable more than one test at the same time, to me this is not useful given it will be not clear who is taking longer unless you do not keep track of that in other ways, like slow query log or performance schema.
How to modify it
You want to modify the queries or table structure?
Do it! Just modify the file joins_queries.lua. There you will find the table definition for the main and level table.
The only thing to be careful of is to change the variables in the load_global_variables() to match your changes and of course you will need to modify the initialize_values_X for main and level table.
If instead you only want to change the queries you have two ways.
-
Add your query to an already existing map
-
Create a new map
Method 1.
Say you want to add a query for the left joins. Identify the left_queries = {…} map and add the query you want to add:
["my_custom_left_query"] = [[SELECT m.continent,year_field, m.enum_field, level1.record_value l1
FROM %s%u as m
LEFT JOIN level1 ON m.l1_id = level1.id and m.enum_field = '%s'
WHERE m.continent = '%s'
ORDER BY m.year_field DESC, l1 DESC
LIMIT 100;]],
Here I am not adding anything special, so I just need to add a pair of [KEY] = <SELECT> using the same attributes.
In case you need to change the attributes, then you need to create a case in the function that fill the query. The function is: function execute_joins(join_name) in joins/oltp_common.lua.
For instance if I want to have my custom query filtering by the attribute color in the main table, I can do:
["my_custom_left_query"] = [[SELECT m.continent,year_field, m.enum_field, level1.record_value l1
FROM %s%u as m
LEFT JOIN level1 ON m.l1_id = level1.id and m.enum_field = '%s'
WHERE m.color = '%s'
ORDER BY m.year_field DESC, l1 DESC
LIMIT 100;]],
In the function I can add a case like:
  if join_name:find("my_custom_left") then
      for i = 1, sysbench.opt[join_name] do
         local tnum = get_table_num()
         query = string.format(query_map[join_name .. "_query"], sysbench.opt.table_name, tnum, get_record_status(), get_color())
         -- print("DEBUG JOIN QUERY B: " .. query .." Join Name: " .. join_name)
         con:query(query)
      end
Done!
Method 2
Just respect the rules as above but instead of using the existing map, you can create your own and then add it to the list query_map = mergeMultiple. As simple as that.
How to help
As said before, this is far from a perfect or exhaustive test, it is a start and the more feedback I get the more I will be able to improve it.
I would really like to get PR or FR with specific tasks, the closer they are to real life cases the better.
In the meantime, I wish you all happy testing.
References
MySQL 8.4: JOIN Clause – The definitive reference for INNER, LEFT, RIGHT, and CROSS joins.
Outer Join Optimization – Explains how the optimizer handles LEFT JOIN and RIGHT JOIN and how to write efficient predicates.
Nested-Loop Join Algorithm – For those interested in the "under the hood" execution of joins in MySQL.
Index Merge Optimization – Crucial for understanding how indexes are used (or not used) during complex joins.